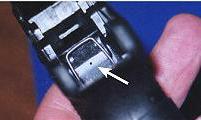
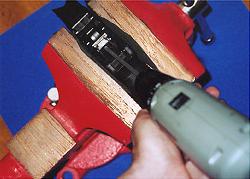
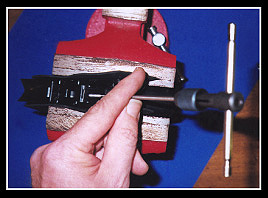
P-11/40 Trigger stopBack to Kel-Tec stuffAnother possiblity is the internal trigger stop, although I like this one better... These instructions origonaly taken (and changed slightly) from a fellow KTOG member perklo027 and can be found here. He got the idea from yet another KTOG memeber, and those instructions can be found here. The Trigger Overtravel Stop instructions herein should be attempted on the KelTec P-11/P-40 pistols only. They are not intended for the P-32 KelTec or any pistols similar in design to the P-11, such as the Taurus PT111. The pins holding the receiver block to the plastic grip on the Taurus pistol are specifically made to buckle in the middle and bind if removal is attempted by the owner. The sale of replacement pins by Taurus is restricted to factory authorized repair shops to keep owners from modifying the PT111. Before you begin you should be familar with the disasembly and reassembly of your P-11 or P-40 and their parts, for those instructions, and list of part numbers (that will be referenced) look here 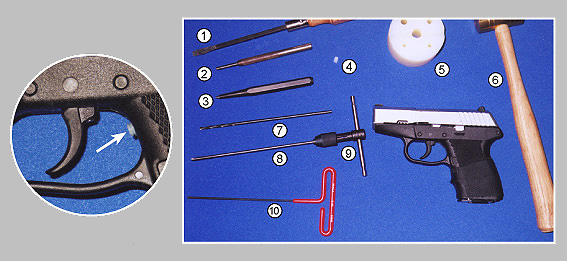
Tools required for installation of trigger overtravel stop:
Tools 1, 2, 3, 9 and 10 could be available locally at a hardware store. The tap wrench is a Hanson from Home Depot, size O-1/4 and cost under five dollars. The Sears store near me had both a complete set of pin punches and also a box of individual punches, so you could buy just the 5/32”, 1/8” and prick punch. I use a set of hex drivers that I got at the dolloar store to press out pins (shown in disassembly instructions). For the bench block I use a 2X4 with a hole in drilled in it. Brownells has many sets and individual punches available at reasonable cost through mail order. They are the largest supplier of specialized gunsmith tools and supplies in the world. GET THEIR CATALOG, they have a book section alone that can teach you a wealth of gunsmithing tricks and lore! Tools 5 and 6, which are specialized gunsmithing tools you will use for every project, come from them. The brass hammer is nice for this type of work. It won’t mar finishes as bad as a steel hammer and I try to avoid hitting steel punches with a steel hammer. Why? Shattered steel from hardened punches; sparks and chips to damage hands and eyes. And most steel hammers are way too heavy for gunwork. An 8 oz. brass hammer is best, and a 4 oz. is okay for light work. A two dollar pair of safety glasses anytime you use impact tools is standard as well. The nylon bench block is one of those items you don’t have to have right away, but once you use one you’ll wonder how you did without. An acceptable substitute is a eight inch block of 2 x 4 board, sanded, with a 1/4” hole drilled in its center. For driving out the plastic pins on a KelTec, you could probably lay the frame across two hardback books that are the same thickness, spaced an inch apart. Tools 7 and 8 (the 6” drill bit and tap) are more specialized, and are available from two industrial supply houses. The part numbers I list are the least expensive version of an item they have, which usually means an imported tool. If you want to buy American, ask the phone rep to look up the part number, but it will cost a good bit more. Ask for a catalog with your order. A normal 10-24 tap with a 12 point 1/4 inch socket and 1/4 inch extetension can be substitued for the extented tap (part 8). Sorry I don't remember what size socket, but just take your tap to the store and find a 1/4 inch 12 point (not a normal 6 point) socket best fits it. Then use a 1/4 inch wratchet to turn the tap. MSC Industrial Supply - 800/645-7270 - They have a catalog of over 4500 pages weighing eight pounds. By far the most in-depth product line, once you order you will get sale catalogs that have some good bargains. Do yourself (and your back) a favor and request the CD-ROM version of the catalog be included in your order. If you have a Mac, ask if the CD version is compatible. 6” #26 Aircraft Extension Drill Bit - #01008267 -$1.53 6” Extension Tap 10-24 - #04708251 - $10.13. Prices are subject to change of course. Airgas/Rutland Tool - 800/289-4787 - their catalog is a “mere” 1100 pages. 6” #26 Aircraft Extension Bit - #8032 6026 - $3.08 and the 6” Extension Tap - # 7117 4016 - $21.04. Their higher prices are due to these parts being made in the USA instead of imported. The above companies have websites, but call the first time as you have to set yourself up as a customer, request a catalog with your order etc. I always like to know if the items are in stock right now. If they are out of stock, try the other guy.
And as I have said, you don’t HAVE to get all these tools for this job, especially if you don’t plan on doing a lot of this Gun Tinkerin’ stuff. Heck, you could use a icepick, compass or even a long nail you sand a good point on in place of the prick punch, since this first project is on a plastic frame. The extended drill bit is pretty much necessary to this job though. Check the length of any drill bits (#26) you may have. They must have at least 4 inches outside the chuck toinstall the overtravel stop.
I know that the 10-24 tap calls for a #21 drill bit, but use the #26. It is a little bit smaller and will result in a tighter fit, and more thread material for the stop to grip on.
If you did mess up somewhere along the line, there is some comfort in the fact that the plastic grips for a P-11 are only about thirty dollars. That sounds like a lot, but when compared to a Browning High-Power or 1911 frame at a couple of hundred dollars it’s small potatoes. With the over travel stop in place, put the frame back in the grip (if you need help here see assembly instructions). Now with the slide off you should be able to get a small screw driver in there enough to make adjustments to the stop. I started by backing out the stop until I got it set to very little over travel. You can check over travel by pulling the trigger without the slide on, but you must keep a finger over the hammer so that if it falls it does not hit the soft aluminum frame. But be carful not to let the hammer pinch your finger. I used a felt tip pen to mark the screw inside the mag well. Now remove the set screw. Count the threads from your mark to the tip of the screw. Now start counting at the head of the screw the same number of threads + 1 (you want to make sure you don't cut it too short) and cut the screw there. Now reinstall the screw so that the slot is pointing the same direction as the first time you installed it. You may have to remove the frame to get it back it, but I was able to do it with the frame in. Now it should be just a little bit too long, and if you pull the trigger it will probably not be able to drop the hammer. Now you can pull the screw out and start trimming off a little at a time. You could use a dremel, grinding wheel, or what ever you have. When I got close I left the screw in and used a long flat file to trim the screw down while it was still in the grip. When you get the screw the length you want it back the stop out a few threads and from the inside of the grip, put a few drops of lock tite on the treads and bottom of the head. Now tighten the over travel stop to the same position you have previously installed it. I also went to the auto parts store and got some black touch up paint and painted the stop so it did not stick out so much when looking at the gun. This can also be done before final instalation, but may require a touch up after it is installed. here is a pic of mine done: 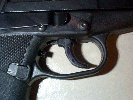
click to enlarge Another method is to use a metal set screw from your local hardware store as StevenTapia did on KTOG. 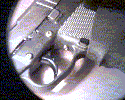
click to enlarge With this method, you just have to get the right length set screw, because to long and it will interfere with the mag, and to short, and it will not get enough threads on the grip to hold well. I would also add some Blue Lock-tite to it to keep it adjusted. |

