Origonaly written and posted by:
Origonal instructions copied and slightly modifed with permission and origonals can be found in Web and pdf format by clicking on the picture/link above. My modifications and additions will be in Blue.
Trigger Drawbar Polish and Overtravel Stop Adjustment
|
|
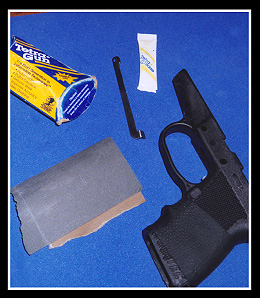
Requirements for polishing P-11 trigger drawbar: 1) 400 or 600 grit sandpaper 2) One of several High-Tech gun greases: Tetra-Gun Grease (a sample pack shown), Wilson Combatís Ultima-Lube or Brownells Action Lube Plus. 3) Helpful, but not shown or necessary, is a popsicle stick to wrap the sandpaper around. The above lubricants are available from Brownells. I usually find at least one for sale at gun stores and shows. All are long lasting and donít attract a whole lot of contaminants as long as you donít leave big globs on and work a thin coat into the metal. They all also claim to bond to metal and stay there. The Tetra-Gun ďGĒ grease I used seems to be working well after a month and two firing sessions with my P-11.
|
 |
| Brownells part number for the Tetra-Gun ďGĒ is
#316-005-001 at about $5.00. The Wilson Combat Ultima-Lube is #965-361-010
at around $6.00. Action Lube Plus is under $12.00 and the part number is
#083-050-002.
|
|
|
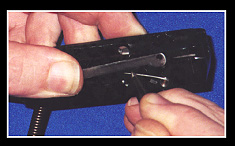
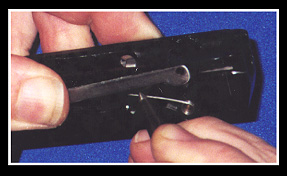
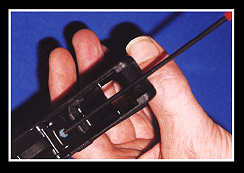
If you followed the earlier suggestions, youíve already let the slide stop spring come off in a ziploc bag, retained the hammer axis/pin with electrical tape and can now remove the slide stop from the left side of the frame block. Flip the frame over to the drawbar (part 260) side and use your prick punch or hex wrench to pull down on the trigger return spring (part 256) as shown at left. While the spring is held down, remove the drawbar by lifting it off the trigger axis (part 254) pin, and pulling the whole bar to the rear and out. Gently release the trigger return spring. |
Remember that you are POLISHING the drawbar, not reshaping it. You just want to remove major burrs and machining marks from all surfaces. Donít lay it on your workbench and press so hard that you bend it either. I didnít take all of the machine marks off mine, because to do so would have required sanding the sides enough to change the thickness and that would have allowed unacceptable side-to-side play when reassembled. The polishing I did do really took a lot of ďpopĒ and roughness out of the pull. Go easy on that groove in the bottom edge; take it down too much and the trigger return spring wonít retain correctly.
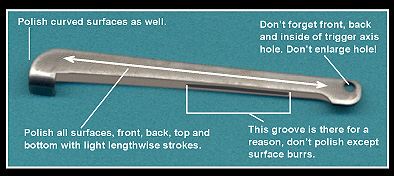 |
| With the polishing done, clean the drawbar of the resulting grit. Donít forget to clean out the trigger axis hole. This should be all the general polishing you need to do on an average P-11 frame, although the slide/barrel is a story for another day. In rare cases, you will have a burr on the hammer, hammer axis or trigger axis that requires smoothing to get at a specific ďpopĒ or ding. As this is rare and requires a more detailed disassembly, make sure you understand the mechanics and make mental notes of the partsí assembled positions before you go after them. And unless you have an obvious burr on the aluminum frame block, donít polish it. Do any polishing of the slide rails on the steel slide to smooth slide travel. As the frame block is a restricted, serial numbered part and much softer than the slide, this is the best way to go. | 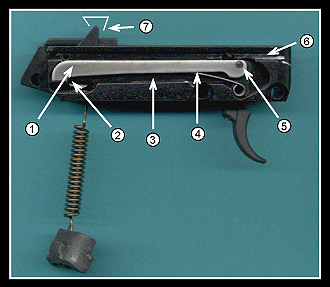 |
Now lubricate the frame/trigger drawbar.
Lubricate with one of the recommended greases using these guidelines: 1) Work a good bit of grease onto all sufaces of the drawbar. Donít leave a thick coat, work it in. 2) Using a toothpick, spread a spot of grease on the bearing surface between drawbar extension and hammer 3) Put a thin film of grease on the slot of the frame in which the drawbar slides back and forth. 4) Fill the groove on the bottom of drawbar that the trigger return spring sits in with grease. 5) Put a spot of grease on the pin that goes in the hole on the drawbar. 6) Lay a thin bead of grease into the slide rail grooves, spread it thin with a toothpick. 7) Work a spot of grease onto the top of hammer, on all surfaces between bracket.
Clean-up any "globs" or excess.
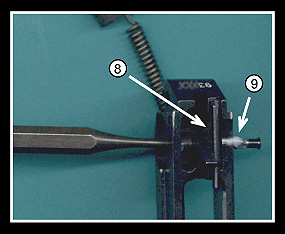
| 8) Using a toothpick, put a thin film of grease on the frame
here so that the side of the hammer is lubricated as it works back and
forth. 9) Lastly, using your 1/8Ē punch as shown as a slave pin, push the
hammer axis/pin almost all the way out (take the retaining tape off first)
and put a spot of grease around the pin. Push pin back in, wipe excess
grease off of the frame and retape.
Your frame and its internal parts are now lubricated and ready for assembly and overtravel stop adjustment. |
 |
| Reassembly and Overtravel Stop Adjustment: |
|
|
The original instructions on the internet called for using a ball-end hex wrench for the overtravel stop adjustment, to avoid disassembling the P-11 repeatedly. I found that to get the best overtravel stop retention, it is best to use a standard hex wrench and go through the process of the repeated assembly, as you shall soon see. Begin by flipping the hammer into a forward position, then reinstalling the trigger drawbar. Use a tool as before to pull down the free end of the trigger return spring and seat it into the groove on the underside of the drawbar. On mine I used a small flat blade screw driver and did not have to take it apart to get to it.
|
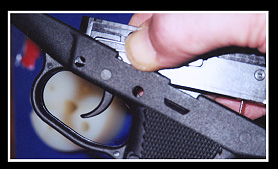
| Hold the frame with the drawbar toward the floor as shown. Remove
the retaining tape from the hammer pin and CAREFULLY install and retain
the slide stop spring with your thumb. If you want to avoid losing the
spring if it flies off, do the assembly of the grip/frame unit inside a
gallon ziploc bag. Remember, holding the frame with the drawbar down will
prevent the hammer pin from falling out. Make sure the dangling hammer
spring and its catch angle freely through the top of the gripís mag
opening.
|
 |
|
|
Flip the assembled grip/frame unit with the magwell up. Use
the long, flat blade screwdriver to push the hammer spring catch up out of
the grip. To avoid stretching the spring, use just enough force to lift
the catch over the bottom of the mag well and back into its retaining
grooves at the bottom rear of the grip. Often you must set the catch
roughly in position then press rearward on the front of the catch with the
screwdriver to make it snap in place. Keep your fingers away from the
catch or they may get pinched between the catch and frame.
|
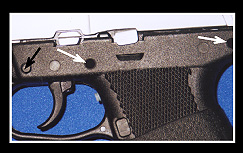
| Note that to save time and wear on pins and grip, you can leave the
middle and rear assembly pins (white arrows) out during the overtravel
stop adjustment. The front (black arrow) pin and the pressure of the
hammer spring provide enough tension to test the overtravel. Finish
reassembly by installing the barrel and recoil springs/guide in the slide.
Put assembled slide back on the frame from the front, push slide all the
way to the rear and press the slide stop up to lock slide to the rear.
Allow the barrel to fall completely forward, then look into the assembly
pin hole and align with the oblong cut in the barrel lug. Insert the
assembly pin all the way in with the grooved side of the tab up. Hold
slide tightly enough to keep it from slamming forward and press down on
the slide stop, releasing it and allowing the slide to ease forward.
|
 |
|
|
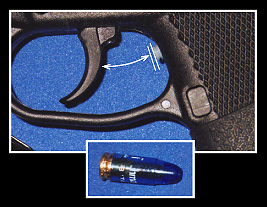
Make sure your assembled gun is unloaded! Many KelTec owners donít use a snapcap for dryfire, I just do by force of habit. Hold the gun so you can see a bit of the installed overtravel stop and the trigger while dry firing. If the stop is out too far for the hammer to release, see if you can turn it from the outside with needlenose pliers padded with a bit of paper towel. If it is too tight to do this without damage, disassemble again and use your long 3/32 hex wrench to back it out a tad. Assembly again and retry; you want to find the exact place that the trigger breaks. When you do, turn the stop in another quarter turn. Here I screwed my over travel stop in all the way (so the large head was flat against the inside of the frame) and adjusted by cutting and sanding the threaded end. Don't try to tighten it too much, you will strip the threads. Just go a little more than bottoming it out. I made a note of the orientation of the slot in the end, so when I took it out to make adjustments and put it back in, I knew I always went back to the same spot. Using this method, the trigger stop can never extend into the trigger guard any more than you set it to causing the trigger not to be able to pulled back far enough to fire, because the head of the nylon screw is bottomed out inside the frame. When I was done adjusting I used Black automotive RTV silicone sealant to hold the screw into place. I put a little on the threads and some on the bottom of the head (where it contacts the inside of the frame), and it has not budged. |
| If you leave it adjusted to the exact point of release, you are just asking for your gun not to fire when you need it. Once the stop is where you want it, use a magic marker or china marker to mark the point on the threads where they meet the threaded hole in the grip. Then disassemble one last time, take the stop completely out and purposely deform the threads behind the mark with needlenose pliers. Donít crush the stop or ruin the threads, but rough them up some to increase tension in the threaded hole. Add blue loctite (#242) to the deformed threads. I like to apply with a toothpick for neatness. The deforming of the threads is the reason I specify not using a ball-end hex wrench; it was so hard to screw the stop in with a ball-end type that the hex recess of the stop started to strip. It takes a long, standard hex wrench to drive the stop in until the mark you made comes through the other side. | 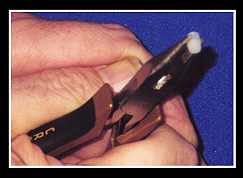 |
|
|
Assemble and dry fire; if you have the stop adjusted to
your satisfaction, set the P-11 aside for at least 24 hours to let the
loctite cure. The combination of the loctite and the deformed threads will
insure that the stop doesnít work loose as the gun is fired.
The stop, polishing and lubrication made the actual pull weight on mine go from a gritty 9 lbs. with pop and terrible overtravel to a smooth 8.25 lbs. with negligable overtravel. Kind of like a smooth, double action revolver pull. I went to the autoparts store and got some black touch up paint and painted the portion of the stop that extened into the trigger guard black, just for looks.... See a close up of it finished here. |
